Important
|
Welcome to the TomTom ONE manual. This manual describes the features of TomTom ONE, the perfect navigation solution for anyone on the move. For a full list of the chapters, see the menu on the left. Some of the most important starting points are listed below:
For lots more information, have a look at the support section of the TomTom website: www.tomtom.com/support
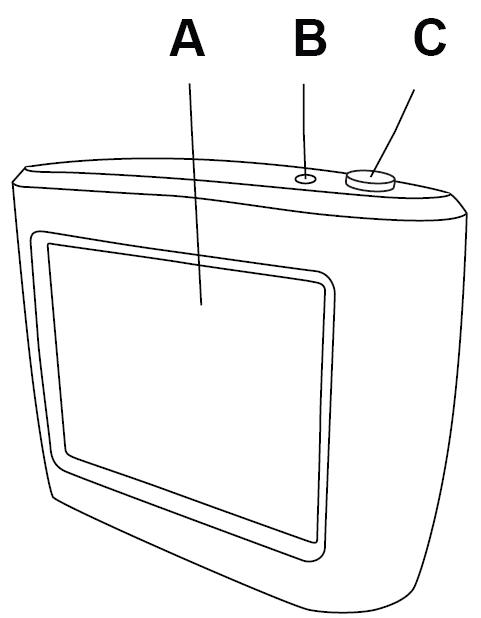
1. Your TomTom ONE
A. Touchscreen |
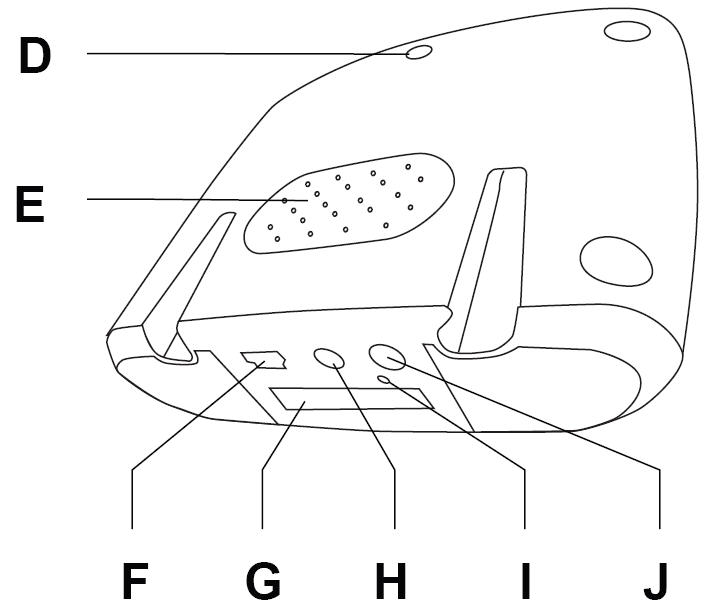
F. USB connector |
B. Charging LED |
G. Memory card (SD card) slot |
C. On/Off button |
H. Power connector |
D. External antenna connector |
I. Reset button |
E. Speaker |
J. Headphone connector |
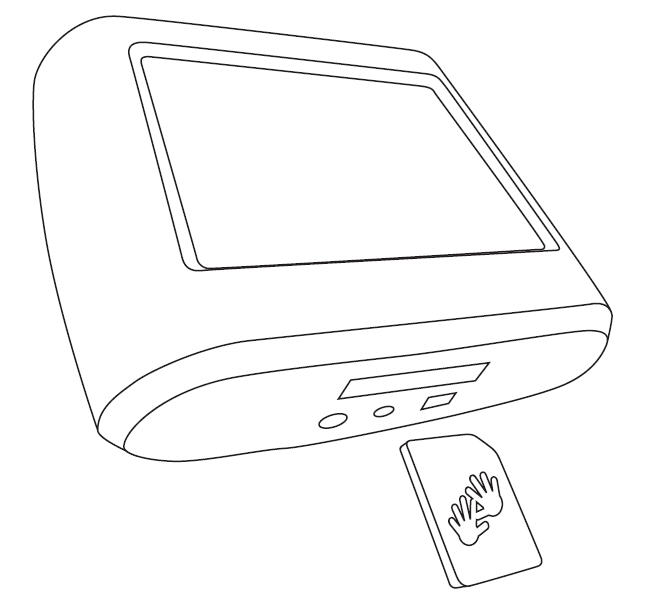
2. A memory card (SD card) containing the application and maps

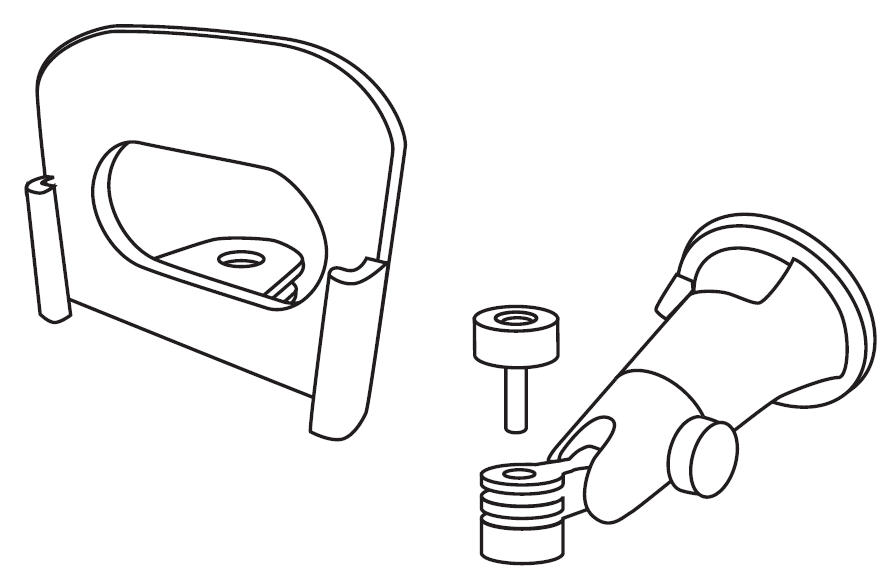
3. Mounting kit: Holder, Suction mount
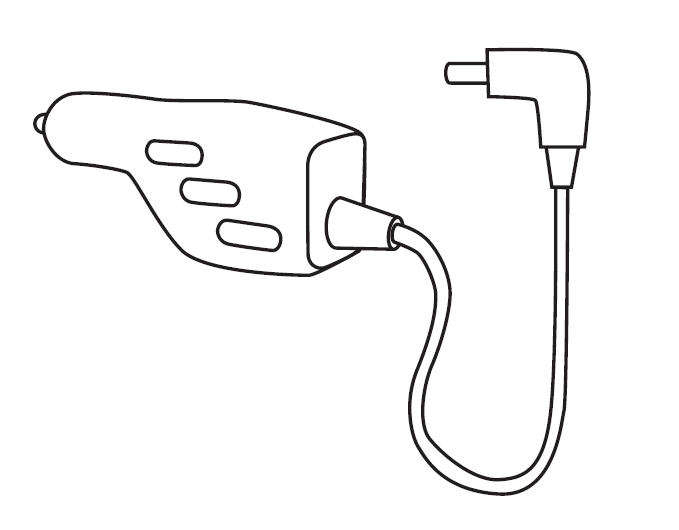
4. Car charger
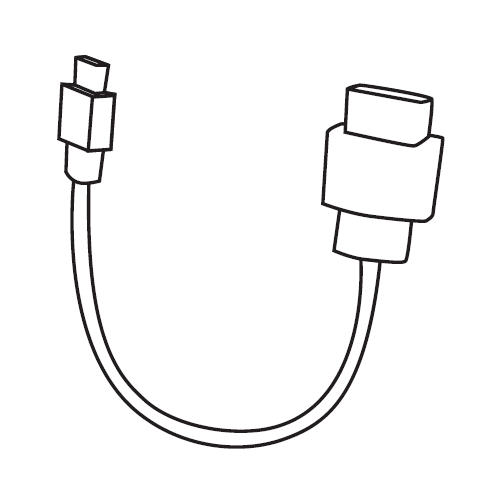
5. USB cable
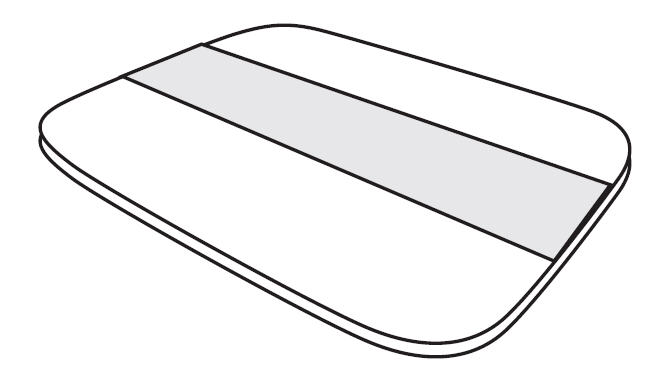
6. Documentation pack

7. Your product code card
Note: TomTom ONE contains a rechargeable battery that can be used for up to 2 hours without charging.
The first time you switch on your TomTom ONE, it may take up to 20 seconds to start. To switch off your TomTom ONE, press and hold the On/Off button for 2 seconds.
Tap the touchscreen to answer the questions on the screen. Your TomTom ONE will then display the Driving View.
The screen is shown in black and white until your TomTom ONE locates your current position. Once this is done, the Driving View is shown in full colour.
The first time you start your TomTom ONE, it can take up to 5 minutes for the device to find your current position. If it takes longer than 5 minutes, make sure that you are in an open place without too many tall buildings or trees around you.
Note: Your TomTom ONE does not transmit your position, so others cannot use it to track you while you are driving.
Note: Some vehicles have a heat reflective shield embedded in the windscreen, which may prevent TomTom ONE from locating your current position. If this is a problem in your vehicle, use the TomTom External Antenna Kit (available as an accessory).
Planning a route with TomTom ONE is very simple. To plan your first route, follow the steps below.
1. Tap the screen to bring up the main menu.
2. Tap 'Navigate to…'
3. Tap 'Address'.
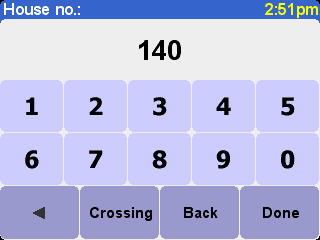
Now you have to specify where you want to go. This is done by selecting first the town, then the street and then either the house number or the point where two streets meet.
Note: If you know the postcode of your destination, you can enter this instead of the address. From the Navigate to… menu, tap Postcode. Then enter the full postcode. (Great Britain and the Netherlands only).
4. Start to type the name of the town where you want to go.
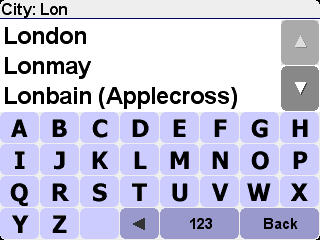
After you have typed a few letters, the names of towns that match what you have typed are shown. When your destination is shown in the list, tap the name of the town to set the destination.
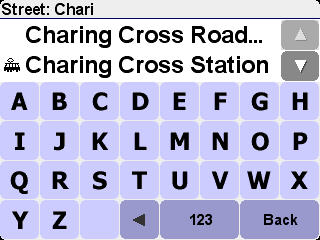
5. Start to type the name of the street.
As with the name of the town, the names of streets that match what you have typed are shown. When your destination is shown in the list, tap the name of the street to set the destination.
6. Now do one of the following:
The route is calculated by your TomTom ONE.
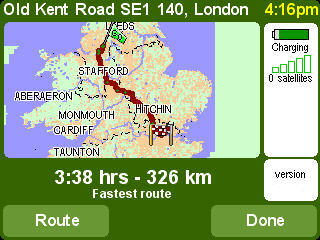
7. When the route has been calculated, tap Done. Your TomTom ONE will immediately start giving you instructions for reaching your destination.
To guide you to your destination, TomTom ONE will give you spoken instructions and visual instructions on the screen.
Note : Before you can plan a route in this way, your TomTom ONE must first locate your current position.
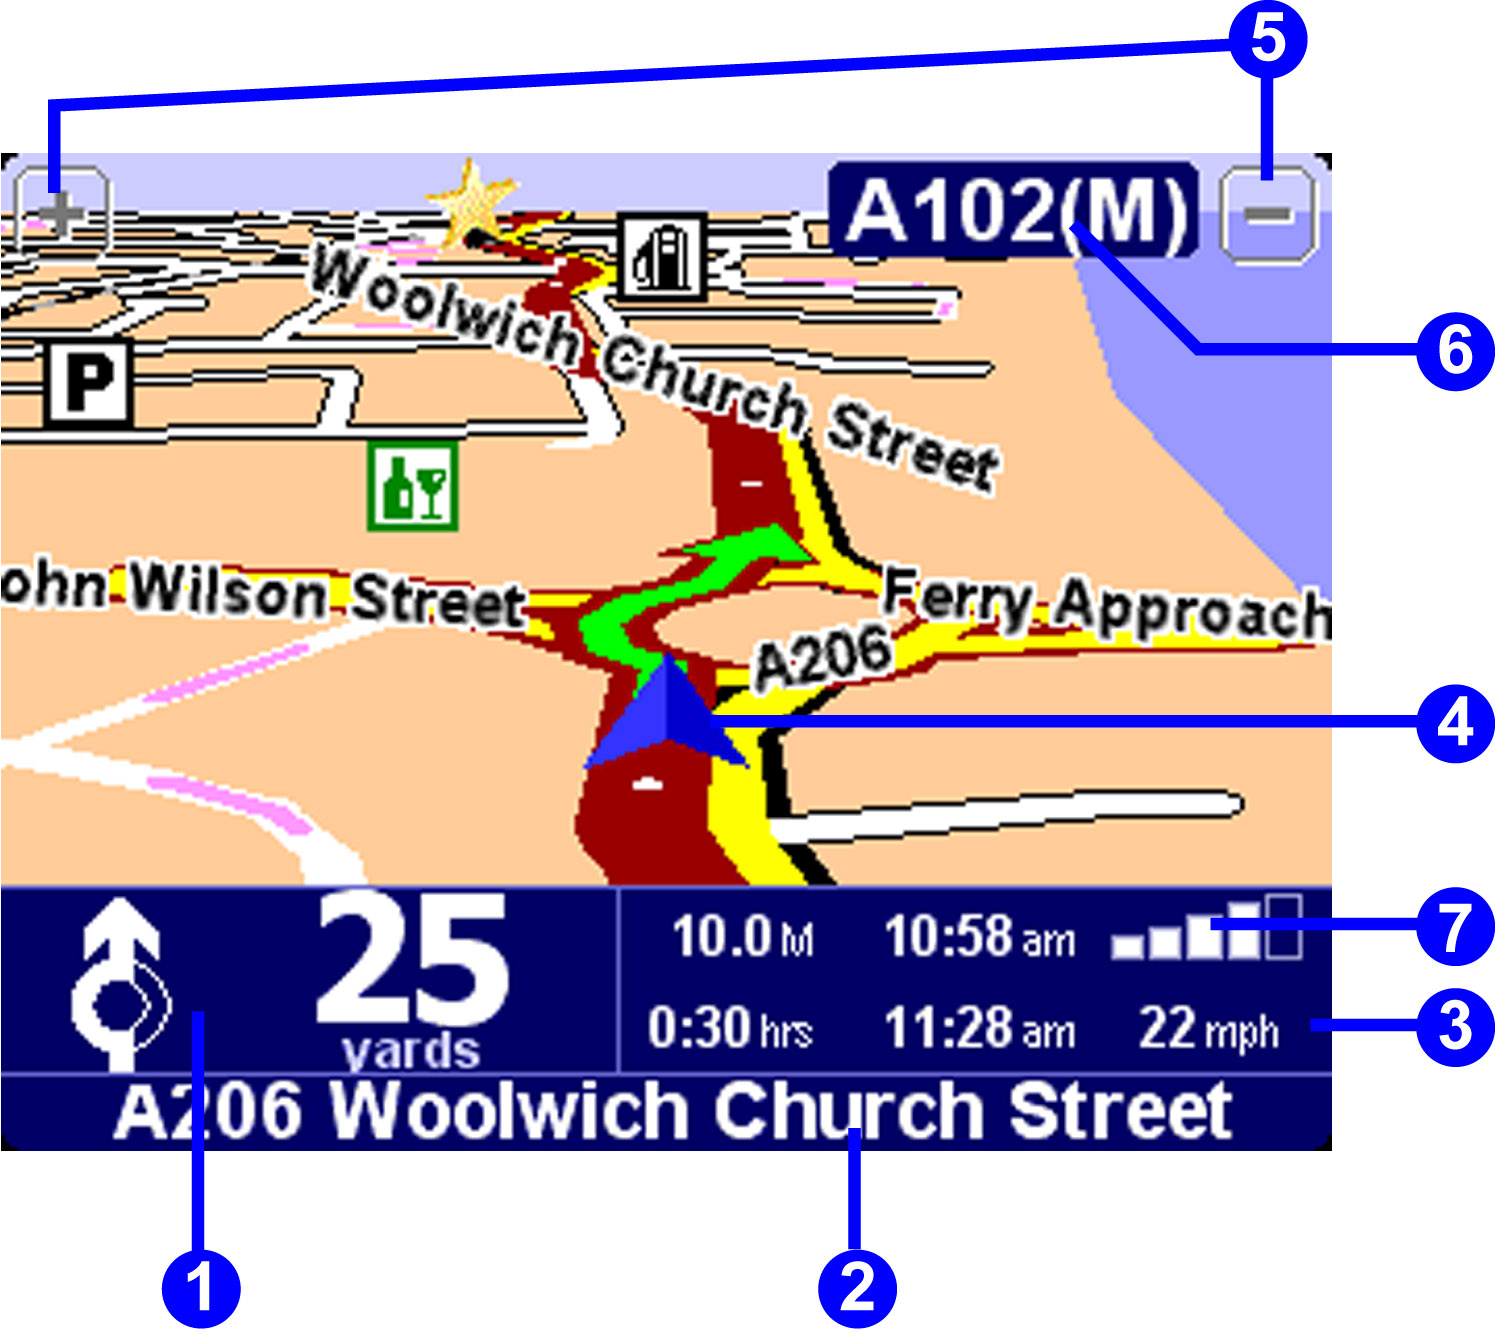
1. The next instruction.
2. The name of the next street to turn onto.
3. Information about your journey: remaining journey time, remaining distance, arrival time. You can select which information is displayed. In the Preferences menu, tap Status bar preferences.
4. Your current position.
5. Buttons to zoom in and zoom out on your position.
6. The name of the next major road, if applicable.
7. Indicator of the strength of the GPS signal. For more information about GPS, see this chapter: What is GPS?
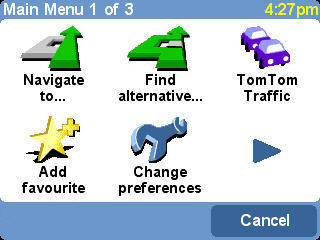
Tap the screen at any time when your TomTom ONE displays the Driving View to open the main menu.
Tap this button to start planning a route. For more information, see: Navigate to...
Tap this button to find an alternative route to the one currently planned. You might change your route to avoid roadblocks up ahead, or to incorporate a stop into your route. For more information, see: Find alternative...
Tap this button to enable or disable traffic information. TomTom Traffic is a subscription service provided by TomTom PLUS. For more information, see: TomTom PLUS
Tap this button to add a favourite. Favourites are locations that you visit frequently and that you want to be able to travel from (and to) without having to enter their address details each time. For more information, see: Favourite locations
This button opens the Preferences menu. You can change many things about the way your TomTom ONE displays information, including the map colours, the volume and the voice used for spoken instructions. For more information, see: Preferences
Whenever you see this arrow, it means that there is another screen of buttons. Tap this arrow to open the next screen.
This section describes how to achieve some of the most common tasks for which you will probably use your TomTom ONE. You can find descriptions of how to do the following:
This section does not cover all the things that you can do with your TomTom ONE. For more detailed information about all of the functions available on your TomTom ONE, use the menu on the left to find the section with the information you need.
You may have already set your 'Home' location when you first switched on your TomTom ONE. If you want to change the location you set, or if you have not set the 'Home' location, you can set it to your current location by following these steps:
Note: If you are not at home, tap Address and enter your home address.
Your current location is now set as 'Home'. You can navigate back here at any time with three taps. See: How to get home
Note: Your Home location need not be your home, it could be your office or any other location you visit regularly.
If you have set your 'Home' location, then no matter where you are, your TomTom ONE will always know how to get you home. For information about setting your home location see: How to set your current location as 'Home'
Follow the steps below:
Your TomTom ONE plans the route from your current position to your home.
Note: Your TomTom ONE will start to give you spoken instructions to navigate you Home, even before it has finished planning the route.
Your TomTom ONE will now start to navigate you home.
When you want to travel to a shopping centre, a tourist attraction, a car park, or any other Point of Interest (POI), but you do not know the address, use TomTom ONE to find the POI.
To navigate to a POI when you do not know the address, follow these steps:

Your TomTom ONE will now guide you to the Point Of Interest you selected.
Even with TomTom Traffic enabled, there will be times when you spot a hold up ahead, perhaps due to an accident or roadworks. To find an alternative route around the traffic jam, do the following:
Your TomTom ONE will start to give you instructions to take you around the jam. You may be advised to turn off at the next junction or to turn around completely, so be prepared to manoeuvre.
Imagine you are on your way somewhere when you get a phone call asking you to drop something off, or pick something up, at a different location on the way. To change your route so that it goes via a particular location, do the following:

Your TomTom ONE starts to give you directions to the destination you are travelling via. After arriving at this location, your TomTom ONE will start to navigate you to your original destination.
When you know the address of your destination, you can tell your TomTom ONE exactly where you are going. But you may also sometimes visit places you do not know. Your first priority when going somewhere new is to find a place to park. To find a parking space, do the following:
Your TomTom ONE starts giving you directions to the car park.
Note: The same technique is useful for navigating to any POI in an unfamiliar town or city.
If you have some local knowledge of an area, you may decide that you do not like the route suggested by your TomTom ONE. For example, it may go too close to a busy town centre. To find an alternative route to the route which has been planned by your TomTom ONE, do the following:
Your TomTom ONE will now guide you to your destination, using a different route that avoids the selected road section. To return to the original route, follow steps one and two above, and then tap 'Recalculate original'.
There will be times when you know exactly where you want to go but you do not know the address or post code. In this case, you can set your destination using the map on your TomTom ONE. To set your destination in this way, do the following:

Your TomTom ONE starts to navigate you to the chosen location on the map.
Note: You can browse your TomTom ONE's maps at any time by tappingon the main menu, then 'Browse map'. For more information about maps and the map browser, see this chapter: Maps
The default colours of the Driving view on your TomTom ONE are very bright to make them easy to see, even on very sunny days. But at night, you do not want the screen to be very bright. To switch to night colours, do the following:

The TomTom ONE display now switches to the default night colours, as shown above. To switch back to the original day colours, tap 'Change preferences' and then tap 'Use day colours'.
For information about changing the default day and night colours, see this chapter: Preferences
Using TomTom ONE you can always know about traffic problems on your route. Your TomTom ONE can alert you to traffic problems as they occur, and alter your route accordingly. Traffic information can also be taken into account when planning a route.
Note: Before you can use TomTom Traffic, you need to set up a TomTom PLUS account. You can test TomTom PLUS services free for one month. For more information about TomTom PLUS, see this chapter: TomTom PLUS
Note: You must establish a Bluetooth connection between your TomTom ONE and your mobile phone before you can use TomTom Traffic.
Note: TomTom Traffic is not available in all countries or areas. For more information, see this chapter: TomTom PLUS
To make sure that your route is replanned when traffic incidents occur on your route, and to make sure that the latest traffic information is always checked by your TomTom ONE when you plan a route, do the following:
You can now plan routes in the usual way. TomTom ONE will automatically download traffic updates and adjust your route accordingly.
Using your TomTom ONE, you can find out about the weather situation at your destination. TomTom Weather is offered by TomTom PLUS, like TomTom Traffic. Weather information from stations around the country is organised to give you some idea of the current weather at any given location. To check the weather at your destination, do the following:
You can also view a weather summary for anywhere in the area covered by your map. Follow steps 1 to 3 above, and then select the location by another method, for example by entering the address.
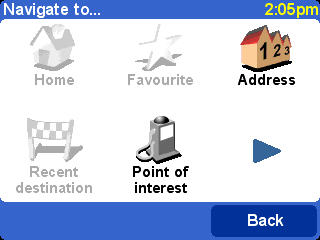
This is the simplest and most useful starting point in most situations.
Given your current GPS position, you can use this to navigate to any given
address, crossing, favourite location, Point of Interest, and so on. Select
'Navigate to...'
![]() to bring up its
first options page.
to bring up its
first options page.
'Recent destination'
![]() is a
useful time-saver, displaying a list of addresses, Points of Interest and other
destinations that you've used before.
is a
useful time-saver, displaying a list of addresses, Points of Interest and other
destinations that you've used before.
'Address'
![]() displays the same
city/street grids that you used in 'Making your first journey', of course, so just choose your destination in the usual way. If
you're not sure of the exact street name to type in, note that simply entering
the city's name again (or using the 'City centre'
displays the same
city/street grids that you used in 'Making your first journey', of course, so just choose your destination in the usual way. If
you're not sure of the exact street name to type in, note that simply entering
the city's name again (or using the 'City centre'
![]() option,
described below) will get you to the geographical centre of the city.
option,
described below) will get you to the geographical centre of the city.
Choosing 'Home'
![]() here is quick and
obvious, though if you chose not to set a home location when setting up your
TomTom system then this may still be greyed out. For more on setting up a home
location, see 'Home preferences'.
here is quick and
obvious, though if you chose not to set a home location when setting up your
TomTom system then this may still be greyed out. For more on setting up a home
location, see 'Home preferences'.
Although you're going to be navigating to many places you don't know
well, there will also be a number of locations that you visit frequently and
that you want to be able to travel from (and to) without having to enter their
address details each time. These are your 'Favourites'. See 'Favourite locations' for more on setting these up. Use
'Favourite'
![]() to navigate to
such a location.
to navigate to
such a location.
Note: 'Favourite' will be greyed out and unavailable if you haven't set any favourites yet.
'Point of Interest'
![]() is your way into
the huge database of railway stations, restaurants, petrol stations, cash
dispensers, and so on. Choosing this will display icons for the five categories
that you use most often. If the one you want now isn't shown here then use
is your way into
the huge database of railway stations, restaurants, petrol stations, cash
dispensers, and so on. Choosing this will display icons for the five categories
that you use most often. If the one you want now isn't shown here then use
![]() to bring up a list of all categories that are available.
to bring up a list of all categories that are available.
Use
![]() and
and
![]() to scroll through the list or enter a few letters of the required
category's name. When you see the category you want, select it, to bring up a
list of all Points of Interest in that category, neatly sorted according to
their distance from your current position. Use
to scroll through the list or enter a few letters of the required
category's name. When you see the category you want, select it, to bring up a
list of all Points of Interest in that category, neatly sorted according to
their distance from your current position. Use
![]() and
and
![]() to scroll through the list or, if you know the name of the Point Of
Interest you want, choose the keyboard icon
to scroll through the list or, if you know the name of the Point Of
Interest you want, choose the keyboard icon
![]() and then
enter a few starting letters.
and then
enter a few starting letters.
There are several icons used beside Points of Interest in the
list. A straight green arrow means that the POI is on your route; a bent green
arrow means that a small detour from your route is needed to reach it; a bent
yellow arrow means that this POI needs a bigger detour from your route;
finally, with no icon shown, the POI is not on your route at all.
Finally, select any Point of Interest to make it your destination.
Tip: Some of the more specialist Point of Interest categories (for example 'Place of worship', 'Theatre') may contain information only for major cities.
By selecting
![]() in the 'Navigate to...' menu, you can view even more navigation options.
Choose 'Post code'
in the 'Navigate to...' menu, you can view even more navigation options.
Choose 'Post code'
![]() if you know this
information for your destination and would prefer to enter this than use the
town or city name. Once you've selected a post code in the list, you'll be
asked to choose a street name (if needed) and house number in the usual
way.
if you know this
information for your destination and would prefer to enter this than use the
town or city name. Once you've selected a post code in the list, you'll be
asked to choose a street name (if needed) and house number in the usual
way.
Tip: You can change your mind and start entering the town name after all. Or indeed start entering a post code in the main Address list. It really is up to you. Note that full postcode support is only available for the UK and the Netherlands.
If you're good with maps and you'd prefer to pick a destination by eye,
or if you're simply not sure of a valid street name or post code to enter,
choose 'Point on map'
![]() . You can then
scroll around the map, zooming in or out as needed. Finally, select a point on
the map as your destination and use 'Done'. For more information on using the
TomTom map browser, see the chapter on 'Maps'.
. You can then
scroll around the map, zooming in or out as needed. Finally, select a point on
the map as your destination and use 'Done'. For more information on using the
TomTom map browser, see the chapter on 'Maps'.
You can 'drag' the map to scroll it in any
direction or drag the zoom control up or down to zoom out or in.
When travelling into an unfamiliar city, you might not know a
destination road name, of course. Choose 'City centre'
![]() to
automatically navigate to the geographical centre of any city name entered in
the usual way.
to
automatically navigate to the geographical centre of any city name entered in
the usual way.
In a similar way, choose 'POI in city'
![]() to navigate to
a Point of Interest in an unfamiliar city (for example a Hotel or Parking
Garage). Choose a city name in the usual way and then a Point of Interest
category. The possible POIs are automatically sorted by proximity to the centre
of the chosen city.
to navigate to
a Point of Interest in an unfamiliar city (for example a Hotel or Parking
Garage). Choose a city name in the usual way and then a Point of Interest
category. The possible POIs are automatically sorted by proximity to the centre
of the chosen city.
Once planned, a summary of the calculated route is
shown on a suitably scaled map. Select 'Route' to explore the route in various
ways. See 'Advanced route planning' for more details.
'Favourites' are locations that you visit frequently and that you want
to be able to travel from (and to) without having to enter their address
details each time. Select 'Add favourite'
![]() to bring up its
first options page.
to bring up its
first options page.
You'll notice that the 'Add favourite' choices are
very similar to those for 'Navigate to', in the last
chapter. Whichever option you use, once the location has been chosen, you'll
get the chance to enter a name for the favourite (for example "Steve's house",
"Office", "Uncle Fred")
Tip: When naming a favourite, the letters you enter automatically replace the highlighted suggestion. If you just wish to add a letter or two to the supplied suggestion, first tap on the highlighted words.
Choose 'Home'
![]() to add your 'home'
location to your favourites list, for extra convenience. If this option is
greyed out, it means that you haven't chosen a 'home' location yet. See 'Home preferences' for more details.
to add your 'home'
location to your favourites list, for extra convenience. If this option is
greyed out, it means that you haven't chosen a 'home' location yet. See 'Home preferences' for more details.
Choose 'Address'
![]() to add a specific
address as a favourite.
to add a specific
address as a favourite.
Choose 'Recent destination'
![]() to add
a favourite from a list of addresses, Points of Interest and other destinations
that you've used before.
to add
a favourite from a list of addresses, Points of Interest and other destinations
that you've used before.
Choose 'Point of interest'
![]() to select a POI
from the built-in databases as a favourite. As with navigating to a POI, you'll
first see the five categories that you use most often, if the one you want
isn't shown then use
to select a POI
from the built-in databases as a favourite. As with navigating to a POI, you'll
first see the five categories that you use most often, if the one you want
isn't shown then use
![]() to bring up the full list. Within each category, you'll see a list of all POIs,
neatly sorted according to their distance from your current position. Simply
pick the one you want to make a favourite.
to bring up the full list. Within each category, you'll see a list of all POIs,
neatly sorted according to their distance from your current position. Simply
pick the one you want to make a favourite.
By selecting
![]() , you can view more options for picking a location as a favourite.
Choose from 'Post code'
, you can view more options for picking a location as a favourite.
Choose from 'Post code'
![]() , 'Point on
map'
, 'Point on
map' ![]() , 'City
centre'
, 'City
centre' ![]() or
'POI in city'
or
'POI in city'
![]() , in exactly the
same way as you would for setting each as a destination in the previous
chapter.
, in exactly the
same way as you would for setting each as a destination in the previous
chapter.
Choosing 'GPS position'
![]() is very
useful when you want to store your current location quickly. For example, you
are passing something interesting and want to return there later. Since you
don't need to bother finding the location by address, it is also one of the
fastest ways of adding a favourite, so consider using this whenever you visit
somewhere that you know you'll want to return to at a later date.
is very
useful when you want to store your current location quickly. For example, you
are passing something interesting and want to return there later. Since you
don't need to bother finding the location by address, it is also one of the
fastest ways of adding a favourite, so consider using this whenever you visit
somewhere that you know you'll want to return to at a later date.
Tip: You don't have to travel, physically, to a location in order to set it as a favourite! Instead, see the 'Cursor functions' in 'Browse map'.
Once a favourite has been chosen and named, it will show up whenever you
pick from your list of favourites, for example in 'Navigate to...'
![]() 'Favourite'
'Favourite'
![]() .
.
Perhaps a route has been planned that you're not happy with? Perhaps you
have been routed via a busy junction? Perhaps you spot road works up ahead? Or
perhaps you really wanted to go 'via' one particular location? This is where
the 'Find alternative...'
![]() option comes in.
option comes in.
Choose 'Travel via...'
![]() if you want to
make sure the planned route goes past one particular location, perhaps to
collect (or drop off) a letter or person. The new location is picked in exactly
the same way as you would pick a departure point or destination, with the usual
options of 'Home', 'Favourite', 'Address', 'Point of Interest', and so on. Once
selected, a new fastest route is calculated, making sure to include your 'via'
location.
if you want to
make sure the planned route goes past one particular location, perhaps to
collect (or drop off) a letter or person. The new location is picked in exactly
the same way as you would pick a departure point or destination, with the usual
options of 'Home', 'Favourite', 'Address', 'Point of Interest', and so on. Once
selected, a new fastest route is calculated, making sure to include your 'via'
location.
Tip: If you want to include more than a single 'via' location in your journey, use the comprehensive Itinerary feature instead, described later in this chapter.
If you spot signs of trouble (such as backed-up traffic or 'Delays
ahead' warning signs), choose 'Avoid roadblock'
![]() . To save
you time (when you're on the road), there are four presets. Estimate whether
the blockage extends '100m', '500m', '2000m' or
'5000m' ahead from your current position and then select the appropriate
icon.
. To save
you time (when you're on the road), there are four presets. Estimate whether
the blockage extends '100m', '500m', '2000m' or
'5000m' ahead from your current position and then select the appropriate
icon.
Once you've chosen a roadblock option, a new route
is quickly calculated that avoids all roads for the chosen distance along the
planned route, routing you right round the troubled area.
Tip: After choosing a roadblock option, look out for a turn direction on the display almost immediately. If you continue into the 'blocked' area, you may want to use 'Find alternative...' and then 'Avoid roadblock' again, to recalculate your best route taking into account your new position.
If you want to avoid a particular road junction, perhaps because it's a
known traffic black spot, choose 'Avoid part of route'
![]() . Use
. Use
![]() and
and
![]() to scroll through the current route instructions, choosing which
junction you want to steer clear of. A new route will then be calculated.
to scroll through the current route instructions, choosing which
junction you want to steer clear of. A new route will then be calculated.
Note: Any junctions that have already been passed are greyed out and can't be selected.
Finally, if you want an alternative route because you simply don't like
the original, choose 'Calculate alternative'
![]() . As far as
possible, a totally different set of roads is used. Once planned, an overview
is shown, as usual, and you can choose 'Route' for detailed instructions
or 'Done' to switch back to the main navigation view. You can keep
asking for (increasingly inefficient) alternative routes using this method
until the message 'No route found' appears. Choose 'Recalculate
original'
. As far as
possible, a totally different set of roads is used. Once planned, an overview
is shown, as usual, and you can choose 'Route' for detailed instructions
or 'Done' to switch back to the main navigation view. You can keep
asking for (increasingly inefficient) alternative routes using this method
until the message 'No route found' appears. Choose 'Recalculate
original' ![]() to
return to the original best route.
to
return to the original best route.
If you have enabled TomTom Traffic and have a valid subscription, you
can also use the menu option 'Minimise traffic delays'
![]() to
recalculate a route to your destination that takes into account all current
traffic incidents. See the chapter on TomTom PLUS for
more details.
to
recalculate a route to your destination that takes into account all current
traffic incidents. See the chapter on TomTom PLUS for
more details.
Although navigating from your current position is the function that
you'll use most often, there may be times when you want to plan ahead. Choose
'Advanced planning'
![]() to look at the
best route and journey time between any two given locations or perhaps to get
directions that will help someone else get to your current position.
to look at the
best route and journey time between any two given locations or perhaps to get
directions that will help someone else get to your current position.
Tip: 'Advanced planning' may be found on another page in the main menu. You may need to use
A familiar options page, but this time asking where
you want to depart from (a question which obviously wasn't needed when
using 'Navigate to...')
Select your departure location in the usual way. You'll then be asked to 'Pick a destination', again with the usual choices. Finally, there's an extra question to answer, since you may be creating this route for someone else. Choose between 'Fastest route', 'Shortest route' (for motor vehicles), 'Avoid motorways', 'Walking route' (i.e. the shortest route, ignoring all traffic rules and excluding motorways), 'Bicycle route' (i.e. the shortest route obeying traffic rules but still excluding motorways) or 'Limited speed' (the quickest route for a vehicle of limited top speed, i.e. many road types are equally preferred, apart from motorways).
If you'd like this choice every time you navigate, or if you'd
like to change the default setting, see 'Planning
preferences'.
Once planned to your preference, the best route is shown on a suitably scaled map. As with 'Navigate to...', you can now select the 'Route' button to explore the detailed route instructions, as detailed in 'View route' below. Finally, select 'Done' to return to the main navigation view.
If you already have a route planned, you can explore it in various ways
by choosing 'View route'
![]() .
.
Choose 'Browse as text'
![]() for a simple
list of the junctions involved and the distances (or times, use the 'Options'
button to change the numbers shown) between them. Selecting an individual
junction from this display or using 'Browse as images'
for a simple
list of the junctions involved and the distances (or times, use the 'Options'
button to change the numbers shown) between them. Selecting an individual
junction from this display or using 'Browse as images'
![]() instead
presents each junction in 3D, with your turn instruction clearly marked. Use
instead
presents each junction in 3D, with your turn instruction clearly marked. Use
![]() and
and
![]() to move
backwards and forwards through your planned route.
to move
backwards and forwards through your planned route.
'Browse as images' is a quick and powerful way to
get a feel for the route you're about to travel.
Along similar lines, but animated, is 'Show route demo'
![]() , which
simulates your journey at anything up to 500% of 'real time' (chosen using a
simple slider). This works well for journeys within a town or city, but you'll
prefer to use 'Browse as images'
, which
simulates your journey at anything up to 500% of 'real time' (chosen using a
simple slider). This works well for journeys within a town or city, but you'll
prefer to use 'Browse as images'
![]() , mentioned
above, for any journey of significant length. To stop the animation, choose
'View route'
, mentioned
above, for any journey of significant length. To stop the animation, choose
'View route'
![]() and then
'Stop route demo'
and then
'Stop route demo'
![]() .
.
Tip: When browsing a route as images, tap on the centre of the touchscreen to switch between 2D and 3D views of each junction.
Finally, you can view your planned route on a traditional map, viewed
from above. Choose 'Browse map of route'
![]() to
overlay the route onto a map that you can zoom and scroll around. See the
chapter 'Maps' for more details of using this display to
your advantage. Or choose 'Show route summary'
to
overlay the route onto a map that you can zoom and scroll around. See the
chapter 'Maps' for more details of using this display to
your advantage. Or choose 'Show route summary'
![]() to
display again the graphical overview of your route that was shown when it was
first calculated.
to
display again the graphical overview of your route that was shown when it was
first calculated.
Choose 'Clear route'
![]() if you'd like to
remove the currently planned route from all views. From this moment on, your
position will still be tracked on the map, but no instructions or guidance will
be provided.
if you'd like to
remove the currently planned route from all views. From this moment on, your
position will still be tracked on the map, but no instructions or guidance will
be provided.
Tip: You do not need to clear a route before planning a new one: this happens automatically.
Although 'Navigate to...'
![]() is fine for casual
travel, it may be that you're planning a journey that's more ambitious. You may
even want to save the details of this journey for future use or to pass them on
to other users. Choose 'Itinerary planning'
is fine for casual
travel, it may be that you're planning a journey that's more ambitious. You may
even want to save the details of this journey for future use or to pass them on
to other users. Choose 'Itinerary planning'
![]() to
create a new itinerary or amend an existing one.
to
create a new itinerary or amend an existing one.
An itinerary is essentially just a list of 'waypoints' and 'destinations'. Your best route is calculated, visiting each in turn (in the exact order you specify). In general, you'd add a 'destination' when you wanted countdown information to arrival on the main navigation view, otherwise you'd add a location as a 'waypoint' that simply has to be travelled through (i.e. it's the 'way you want to go').
A typical itinerary, showing both waypoints to be travelled
through and destinations you want to arrive at.
When first started, the itinerary planner will be empty, of course. Use 'Add' to select locations in the normal way, choosing from 'Home', 'Favourite', 'Address', 'Recent destination', and so on. Each location will be added as a waypoint if the previous one was also a waypoint, otherwise it will be added as a destination.
Note that the exact menu options shown here will
change depending on whether the current itinerary entry is a waypoint or
destination, and on whether it has been visited already.
You can manage an individual entry in an itinerary by selecting it,
after which you'll see the waypoint menu (above). Use 'Mark as waypoint'
![]() to change
the entry from a destination to a waypoint, or 'Mark as destination'
to change
the entry from a destination to a waypoint, or 'Mark as destination'
![]() to change
it from a waypoint to a destination.
to change
it from a waypoint to a destination.
Use 'Mark as 'visited''![]() to mark this itinerary entry and all preceding ones as
completed, so that navigation will continue from the next (unvisited) entry.
You can even go back and travel part of an itinerary again by selecting
somewhere you've already been and using 'Mark as 'to visit''
to mark this itinerary entry and all preceding ones as
completed, so that navigation will continue from the next (unvisited) entry.
You can even go back and travel part of an itinerary again by selecting
somewhere you've already been and using 'Mark as 'to visit''
![]() , in which
case this and all following itinerary entries will be included in navigation
again.
, in which
case this and all following itinerary entries will be included in navigation
again.
'Delete item', 'Move item up' and 'Move item down' are self-explanatory.
If you want to save your itinerary for re-use in the future, or if you
want to load a previous itinerary, choose 'Options', using 'Save
itinerary'
![]() or 'Load
itinerary'
or 'Load
itinerary'
![]() respectively. When saving, you can enter a name for the itinerary using the
standard touchscreen keyboard (by default it takes its name from your last
destination).
respectively. When saving, you can enter a name for the itinerary using the
standard touchscreen keyboard (by default it takes its name from your last
destination).
By saving your itineraries, you can re-use them at
a later date without having to re-enter any of the locations. Use this page to
save, load or delete an itinerary, or to start a new one.
Select 'Start navigation'
![]() on the
'Options' menu to start navigating.
on the
'Options' menu to start navigating.
In addition to all the features that are included with TomTom ONE, TomTom PLUS provides you with a range of additional services. For example:
Note : TomTom Traffic is not available in all countries or areas. Go to www.tomtom.com/plus for more information.
Many more services are available and more are being added all the time. Go to www.tomtom.com/plus for more information.
Note : To use TomTom PLUS, you need a GPRS-ready mobile phone with Bluetooth. If you already read email or browse the Internet with your mobile phone, then it is probably GPRS-ready; if you are not sure, ask your network provider.
If you have a Bluetooth-capable mobile phone then you can use your TomTom ONE to access TomTom PLUS services.
Note: Visit www.tomtom.com for a list of compatible Bluetooth-enabled phones.
This is the very first time you have used your TomTom ONE with your phone and there are a few steps needed to 'pair' the two devices, i.e. make a connection.
Tip: To allow automatic connection from now on, make your TomTom ONE a ‘trusted’ device on your phone. See your phone manual for details.
You'll be taken through the very brief sign-up process when you try to use any of TomTom PLUS's services for the first time. Enter your email address as your TomTom PLUS user name and "PLUS" as your password. That's it! You can now use any of the extra services.
Enter your e-mail address.
For free trial enter ‘PLUS’.
You'll now receive an email with your user name and password, giving you access to the member area of the TomTom PLUS web site. You can then go to www.tomtom.com to purchase subscriptions and find out about offers and free services that are available for your product.
Tip: TomTom Traffic has been designed to retrieve traffic information over a GPRS connection. Do not use it with a GSM data connection, as this can lead to substantial communication costs.
Note: Due to its dynamic nature, traffic information can by definition never represent the full, current traffic situation. There are locations for which information is not available, and some incidents might not be detected on time. Quality, coverage and reporting times will differ from one region to the other.
Choose 'TomTom Traffic'
![]() and then
'Enable traffic'
and then
'Enable traffic'
![]() to switch
on the main TomTom Traffic service and the other related route planning and map
display functions. If there is traffic information available for your area,
TomTom traffic will stay enabled until you choose 'Disable traffic'
to switch
on the main TomTom Traffic service and the other related route planning and map
display functions. If there is traffic information available for your area,
TomTom traffic will stay enabled until you choose 'Disable traffic'
![]() later
on.
later
on.
Select 'Update traffic info'
![]() to
download the latest traffic information for your area (if available) from the
TomTom Traffic Internet server, using your phone's GPRS data connection. Back
in the main navigation view, you'll notice a new traffic 'route bar' on the
right hand side of the display. In the top right corner is a special animation,
which TomTom Traffic uses to show you its current status:
to
download the latest traffic information for your area (if available) from the
TomTom Traffic Internet server, using your phone's GPRS data connection. Back
in the main navigation view, you'll notice a new traffic 'route bar' on the
right hand side of the display. In the top right corner is a special animation,
which TomTom Traffic uses to show you its current status:
| Traffic information is being updated | |
| Traffic information was updated less than 10 minutes ago | |
| Traffic information was updated less than 20 minutes ago | |
| Traffic information was updated less than 30 minutes ago | |
| Traffic information was updated less than 40 minutes ago | |
| Traffic information was updated more than 40 minutes ago | |
| If the colour of the indicator turns yellow, this means there is more up-to-date traffic information available on the server for you to download | |
| The connection to the TomTom Traffic server failed. Try
choosing 'Update traffic info' again. If it still fails, it's probably
for one of the following reasons: GPRS settings incorrect. Ask your network provider for help with your phone's settings. The account is registered for another device. Select 'New device' in the 'My Traffic' section of 'My TomTom' on www.tomtom.com and try again. (You can only use your Traffic account on one device at a time.) Your subscription has expired. In the Traffic section of 'My TomTom' you can look up details of your traffic account and extend your subscription. |
If you have a route already planned, you'll also be able to use the route bar, beneath the TomTom Traffic status animation. Imagine the bar, from bottom to top, represents the remainder of your journey. Traffic incidents are then shown at the appropriate relative points along the route bar, so that you can see what obstacles await you. TomTom Traffic uses a variety of different incident icons, as shown below:
|
|
Traffic incident |
|
Road works |
|
Avoided traffic incident |
|
|
Accident |
|
One or more lanes closed |
|
Fog |
|
|
Traffic jam |
|
Road closed |
|
Rain |
|
|
Wind/Storm |
|
Snow/Ice/Hail |
You'll see these same icons used in more detail within the main
'TomTom Traffic'
![]() system. Use
the menu option 'Show traffic info'
system. Use
the menu option 'Show traffic info'
![]() to
display an overview of all incidents on your planned route. In addition to the
icons above, the overview also shows three different road patterns:
to
display an overview of all incidents on your planned route. In addition to the
icons above, the overview also shows three different road patterns:
![]() (slow traffic),
(slow traffic),
![]() (stationary
traffic) and
(stationary
traffic) and ![]() (road works).
(road works).

A typical TomTom Traffic overview. Choose 'Update' to get
the latest traffic information from the TomTom server.
Selecting 'Replan' will calculate a new best route for you,
automatically taking into account the incidents and their severity. For
clarity's sake, incidents on the overview are shown as simple red circles. If
you'd like more details, you can use ![]() and
and ![]() to step
through the incidents, one by one.
to step
through the incidents, one by one.
The number (for example 1st of 17) in
the title bar indicates which incident you're viewing along your route.
Note: A planned route may still take you through a traffic jam if this is still considered to be the fastest way to your destination (i.e. faster than less congested alternatives).
Tip: As an alternative to using 'Replan' on the TomTom Traffic overview display, you can use 'Minimise traffic delays' on the 'Find alternative' menu.
Instead of being restricted to the scope of a particular route, you can
also choose 'Browse map'
![]() to view
all traffic incidents applicable to your local map. As usual, you can scroll
around and zoom in and out, to see any area in appropriate detail.
to view
all traffic incidents applicable to your local map. As usual, you can scroll
around and zoom in and out, to see any area in appropriate detail.
As you zoom further into the map, TomTom Traffic
will change incident indicators into detailed icons, giving you more
information. If you select an individual incident, full details will be shown
in the same way as within Show traffic info above.
Depending on your GPRS rate with your network provider, you may want to
use 'Change Traffic preferences'
![]() to
automatically keep TomTom Traffic (and your route) updated while you're on the
road. For full automation, select 'Automatically update traffic info while
on route' and 'Automatically optimise the route after every update'.
You'll probably also want to select 'Beep when route traffic situation
changes', to receive an audio warning when the update takes place and a new
traffic situation is reported.
to
automatically keep TomTom Traffic (and your route) updated while you're on the
road. For full automation, select 'Automatically update traffic info while
on route' and 'Automatically optimise the route after every update'.
You'll probably also want to select 'Beep when route traffic situation
changes', to receive an audio warning when the update takes place and a new
traffic situation is reported.
Choose the main menu option 'TomTom Weather'
![]() to get an
impression of the current weather at any location, selected using the usual
destination options. Using your configured wireless GPRS Internet connection,
TomTom looks up weather information from thousands of weather stations around
the world, presenting the most suitable to the selected
location.
to get an
impression of the current weather at any location, selected using the usual
destination options. Using your configured wireless GPRS Internet connection,
TomTom looks up weather information from thousands of weather stations around
the world, presenting the most suitable to the selected
location.
In addition to the two dynamic services above, you can also download many extras, such as new sets of Points of Interest, new voices, etc. The items that appear for download could comprise some extra, free items (available for everyone), as well as the items you've already purchased (so you can reload them if needed) and a limited number of 'premium' items (during an initial period). The list of items that appears on your device will vary according to the number of free premium items you have ‘used up’ during your initial period. You can purchase more premium items at any time from www.tomtom.com.
Start by choosing 'PLUS services'
![]() from the
main menu.
from the
main menu.

Choose 'Download a map'
![]() to grab a map
of a city that didn't already come with your TomTom system. For example, if
you're planning a weekend or city trip, you can download the city map for your
destination. Follow the prompts, choosing a country and then searching for the
city you want.
to grab a map
of a city that didn't already come with your TomTom system. For example, if
you're planning a weekend or city trip, you can download the city map for your
destination. Follow the prompts, choosing a country and then searching for the
city you want.
Some of the matches may be marked as '[big]' or
'[free]', indicating that they're either too large to comfortably download over
GPRS or that they're free to all (so you don't have to worry about downloading
them within your initial period).
Tip: City maps can be large in size. For bigger cities we advise you NOT to download the maps directly to your device since the costs for the GPRS data session can be significant. For these larger maps, it’s better to download them first on your desktop computer and then transfer them using your usual connection.
Here we're about to download a city map. Note that
you will be warned if there’s not enough space on your device to download
the area or city chosen.
To start using your newly downloaded map, use 'Manage maps'.
Downloading a new set of Points of Interest is very similar. Use
'Download POI'
![]() . Only sets
that are free, part of your purchased system or available under an initial
period will be listed.
. Only sets
that are free, part of your purchased system or available under an initial
period will be listed.
Once downloaded, you can navigate to POIs in the
new sets in the usual way, or opt to display them on your maps using 'Show POI' and 'Manage POI'.
Your TomTom system comes with a number of voices that guide you during navigation. With TomTom PLUS you can download new voices to find one that suits you better (or just for fun). The digital voice sample files are relatively large in size, so you shouldn't normally download them directly to your device using GPRS. Use your desktop's fast Internet connection, logging in to www.tomtom.com, then transfer the voice files using your USB cable instead. Once downloaded, use 'Change voice' to start using the voice samples in navigation.
As before, only free voices or premium voices that
you have already purchased will be listed.
Your TomTom system comes with a number of different map and navigation
colour schemes, to cater for personal preference, regional differences and
night/day use. Use 'Download map colours'
![]() to see
the extra schemes available on TomTom PLUS.
to see
the extra schemes available on TomTom PLUS.
Once downloaded, use 'Change map colours' to browse to and select a new colour scheme.
Choose 'Download update'
![]() to check
for application updates for your TomTom system. If one is available, note that
it may have to be installed via your desktop computer.
to check
for application updates for your TomTom system. If one is available, note that
it may have to be installed via your desktop computer.
You can use 'Edit service account'
![]() to
enter updated TomTom PLUS username and password details on your device, perhaps
because you changed them to something more memorable on
www.tomtom.com.
to
enter updated TomTom PLUS username and password details on your device, perhaps
because you changed them to something more memorable on
www.tomtom.com.
Note: TomTom PLUS services vary by country and are updated regularly. Please visit www.tomtom.com frequently to find out about new premium content and special offers.
Note: The use of TomTom PLUS services does not take into account the cost of GPRS data calls from your device. Please check your network operator for cost details.
The digital maps form the basis of everything your TomTom product can do and many functions make use of the map browser. This chapter explains how to move around in the browser and how to use it to set up destinations and search for things.
Choose 'Browse map'
![]() to get started in the map browser. The map view is oriented in the same
way as in a paper map, i.e. with north 'upwards', and shows the usual cities,
towns, major roads, streets, railway lines, rivers and lakes. Unlike a paper
map, you can zoom in and out and vary the amount of detail shown. You can also
overlay categories of Points of Interest, Traffic information (if subscribed)
and personal elements such as favourite locations and departure/destination
points.
to get started in the map browser. The map view is oriented in the same
way as in a paper map, i.e. with north 'upwards', and shows the usual cities,
towns, major roads, streets, railway lines, rivers and lakes. Unlike a paper
map, you can zoom in and out and vary the amount of detail shown. You can also
overlay categories of Points of Interest, Traffic information (if subscribed)
and personal elements such as favourite locations and departure/destination
points.
|
The main elements of the map browser
are: |
Note: The appearance of the map and its associated controls will differ slightly when using live Traffic information (dimmed main colours, highlighted traffic incidents).
You can scroll around a map by dragging it with your finger. Maps will
usually be scaled for you, perhaps to encompass a recently-calculated route or
to show details of a particular junction, but you can adjust the scale yourself
if needed. If the zoom bar is showing, simply drag its handle
![]() up and down slowly. The map will be continuously zoomed in (when
sliding down) and out (when sliding up) around the current cursor position.
up and down slowly. The map will be continuously zoomed in (when
sliding down) and out (when sliding up) around the current cursor position.
Tip: Only a 'blocky' preview map is shown while you're changing the zoom level. The moment you lift your finger, the map is drawn properly in full detail.
The cursor ![]() is your most valuable tool in the map browser. Select
any spot on the map to place the cursor there. You can then do things with the
current cursor position by using the cursor function
is your most valuable tool in the map browser. Select
any spot on the map to place the cursor there. You can then do things with the
current cursor position by using the cursor function
![]() .
.
After positioning the cursor, the nearest road segment is
automatically highlighted in green and labelled, together with start and finish
house numbers on each side of the road segment (if relevant).
Choose 'Navigate there'
![]() to plan a route
from your current GPS position to the cursor position.
to plan a route
from your current GPS position to the cursor position.
Choose 'Centre on map'
![]() to make the
cursor position the new map centre, i.e. with your chosen spot in the centre of
the display.
to make the
cursor position the new map centre, i.e. with your chosen spot in the centre of
the display.
Choose 'Find nearby POI'
![]() to find the Point
Of Interest nearest to the cursor position. As usual, icons are shown for the
five categories that you've used most recently, use
to find the Point
Of Interest nearest to the cursor position. As usual, icons are shown for the
five categories that you've used most recently, use
![]() to bring up a list of all categories that are available. Within a category, use
to bring up a list of all categories that are available. Within a category, use
![]() and
and
![]() to scroll through the list of all Points of Interest, neatly sorted
according to their distance from your cursor position. Choose the one you want,
to display it (or as near as it's possible to get to it using standard roads)
in the centre of the map display.
to scroll through the list of all Points of Interest, neatly sorted
according to their distance from your cursor position. Choose the one you want,
to display it (or as near as it's possible to get to it using standard roads)
in the centre of the map display.
Choose 'Add as POI'
![]() to add the cursor
position as a new POI item in one of your own categories. For example, adding a
new company site to a 'Your offices' category. If you haven't yet created any
categories, you'll be offered the chance to create one now.
to add the cursor
position as a new POI item in one of your own categories. For example, adding a
new company site to a 'Your offices' category. If you haven't yet created any
categories, you'll be offered the chance to create one now.
Note: You can't add extra Points of Interest to the built-in POI categories.
Choose 'Travel via...'
![]() to create a
route that includes the cursor position.
to create a
route that includes the cursor position.
Finally, and perhaps most usefully of all, tap on 'Add as
favourite' ![]() to
set the current cursor position as a favourite location. This can be invaluable
for locations which don't have known or recognised addresses.
to
set the current cursor position as a favourite location. This can be invaluable
for locations which don't have known or recognised addresses.
Use the
![]() control
('Find') to scroll the map quickly to any specific location (Address,
Recent destination, POI, etc.) In addition to centering the map on your chosen
location, the zoom level is also reset to show the location in appropriately
high detail.
control
('Find') to scroll the map quickly to any specific location (Address,
Recent destination, POI, etc.) In addition to centering the map on your chosen
location, the zoom level is also reset to show the location in appropriately
high detail.
You'll be familiar with the types of location that
can be found. Note that the 'Point of Interest' option finds and sorts
items by distance from your current GPS position, not by distance from the
centre of the map or from the cursor position. To find Points of Interest
sorted by distance from the cursor position, see 'Find nearby POI' in
Cursor functions, above.
Use the 'Options' button to customise the level of detail shown on the map.
The choices made here will apply to all future
displays of the map view.
Clearing the 'Names' check-box (it's selected by default) will stop the display of relevant town and district names. Selecting 'Favourites' will pop up a yellow star for each favourite location (only on the map view). If TomTom Traffic is enabled, note you can select 'Traffic' to show current traffic information on the map (whose appearance will be altered to highlight traffic incidents).
You can turn on (or off) the display of 'Points of Interest' on the map view by selecting its check box. Which Points of Interest are displayed depends on the categories you have chosen to show. You can make this choice now, by selecting the 'POI' button, or later, using 'Manage POI' in Preferences.
Depending on which application package you purchased, there may be more than one map database available. If so, you can use 'Manage maps' in Preferences to switch maps or even download a new one.
You can change much of the look and feel of your TomTom system to
your own liking by using 'Preferences'
![]() . To see all the
options described in this chapter, use
. To see all the
options described in this chapter, use
![]() to cycle
through the different pages.
to cycle
through the different pages.
Note: The icons shown for some preferences will change, depending on the state the preference is currently in. For example, choosing 'Turn off sound'disables the spoken instructions. Once disabled, the option and icon change to 'Turn on sound'
, reflecting the action to take when next selected.
Bright colours are normally used, with a lot of contrast, so that you
can see the map clearly even in bright sunlight. When it is dark outside, you
may want to 'Use night colours'
![]() . The navigation
view will then be displayed (by default) using dark and subdued colours that
will not interfere with your night vision. In addition, the preference is
changed to 'Use day colours'
. The navigation
view will then be displayed (by default) using dark and subdued colours that
will not interfere with your night vision. In addition, the preference is
changed to 'Use day colours'
![]() ; select this to
revert to the original colour scheme.
; select this to
revert to the original colour scheme.
These are the default night colours, but you can select any
colour scheme you like, for either day or night use, by using the preference
'Change map colours'.
The Driving view, showing maps, routes and Points of Interest from
the perspective of the driver, can be switched to a more conventional view.
Choose 'Turn off 3D display'
![]() to revert to an
overhead 'plan' map, albeit one which is constantly rotated to keep your
current direction of travel pointing 'up' the display. Choose 'Turn on 3D
display'
to revert to an
overhead 'plan' map, albeit one which is constantly rotated to keep your
current direction of travel pointing 'up' the display. Choose 'Turn on 3D
display' ![]() to
return to the original view.
to
return to the original view.
In addition to the alternative 'plan' view shown here, there's
also a simple 'schematic' view.
Above a specified speed, for safety reasons, the main map view can be
replaced by a 'schematic' view, focussed on the next driving instruction. You
can choose to use this feature by choosing 'Turn off map display'
![]() . Select 'Above
certain speed' to specify a cut-off speed, or 'Always' to have the schematic
view shown at all speeds. Choose 'Turn on map display'
. Select 'Above
certain speed' to specify a cut-off speed, or 'Always' to have the schematic
view shown at all speeds. Choose 'Turn on map display'
![]() to always show
the map again.
to always show
the map again.
Note the way the distance to the upcoming turn information is
shown in the bottom-left of the display.
You'll find it useful to just show specific categories of Points Of
Interest (POI) on the navigation and map views, using the preference '
'Manage POI'. Once you've spent time carefully browsing
through the categories and choosing the ones you need, you can hide all of them
from the main navigation view in one stroke with 'Hide POI'
![]() or show your
preferred set again with 'Show POI'
or show your
preferred set again with 'Show POI'
![]() .
.
You can turn off the voice that gives navigation instructions by
choosing 'Turn off sound'
![]() . This is
indicated during navigation by the
. This is
indicated during navigation by the
![]() icon in the
lower left-hand corner of the display. To turn the spoken instructions back on
again, select 'Turn on sound'
icon in the
lower left-hand corner of the display. To turn the spoken instructions back on
again, select 'Turn on sound'
![]() .
.
To change the volume of the spoken instructions, use 'Volume preferences'. To select another voice (i.e. gender and/or language), use the preference 'Switch language'.
You can change the volume of the spoken instructions by using 'Volume
preferences' ![]() , with its sliding scale to set the required volume in
increments of 5%. The 'Test' function is a good way to get the volume
right before starting your journey.
, with its sliding scale to set the required volume in
increments of 5%. The 'Test' function is a good way to get the volume
right before starting your journey.
You may also find it helpful to use 'Link volume to speed', so that the spoken instructions get louder as road noise increases and are at their quietest when you are stationary.
In time, you may want to use 'Manage favourites'
![]() to delete any
favourite locations that are no longer needed. You can also rename them, if you
wish. Use
to delete any
favourite locations that are no longer needed. You can also rename them, if you
wish. Use
![]() and
and
![]() to scroll up and down the list and pick the one you want to change
or delete.
to scroll up and down the list and pick the one you want to change
or delete.
You can back up your favourite locations by connecting your TomTom ONE to your PC or Mac. See 'Connecting to your computer' for more details.
Note: If you haven't added any favourite locations yet, the 'Manage favourites' icon will be greyed out and unavailable.
Tip: The way to change a favourite's location is to delete the current instance and create a new one at the correct location. See Favourite locations.
You can set or change your 'Home' location at any time by using
'Change Home location'
![]() . You will then
be able to select this later as a departure or destination point.
. You will then
be able to select this later as a departure or destination point.
Tip: 'Home' doesn't necessarily have to be your physical home. Set it to the location that is most central in your travels, perhaps your office.
If you have maps of another country or area installed, the preference
'Manage maps'
![]() will be
enabled. Choose 'Switch map'
will be
enabled. Choose 'Switch map'
![]() to switch to
another map that's already available. The map that you are currently using is
highlighted in yellow, select the map you wish to use next.
to switch to
another map that's already available. The map that you are currently using is
highlighted in yellow, select the map you wish to use next.
Choose 'Download a map'
![]() to buy extra
maps directly from TomTom using your optional GPRS phone connection. Simply
follow the prompts to choose the area or city that you'd like to buy. Be aware
that your network provider will charge your download at your usual GPRS rate
and that TomTom are not responsible for any extra charges you may incur.
to buy extra
maps directly from TomTom using your optional GPRS phone connection. Simply
follow the prompts to choose the area or city that you'd like to buy. Be aware
that your network provider will charge your download at your usual GPRS rate
and that TomTom are not responsible for any extra charges you may incur.
See also Connecting to your computer, which includes instructions for the loading of new maps from CD.
The preference 'Manage POI'
![]() is your control
panel for Points of Interest and their categories. It's easy to create new
categories of your own (for example 'Offices', 'Garden centres', 'Customer X')
and populate them with relevant Points of Interest that can be navigated to or
added to an itinerary in seconds.
is your control
panel for Points of Interest and their categories. It's easy to create new
categories of your own (for example 'Offices', 'Garden centres', 'Customer X')
and populate them with relevant Points of Interest that can be navigated to or
added to an itinerary in seconds.
You can add new Points of Interest to categories that you've created
yourself. Firstly, use 'Add POI Category'
![]() and then
choose 'Add POI'
and then
choose 'Add POI'
![]() . You'll then be
asked to pick a category (and prompted to add one if you haven't made any yet),
then pick a location in the usual way.
. You'll then be
asked to pick a category (and prompted to add one if you haven't made any yet),
then pick a location in the usual way.
In both the main navigation view and on all map views, you can choose
which Points of Interest categories are shown by selecting 'Enable/Disable
POI' ![]() . Just
select the ones you want to show.
. Just
select the ones you want to show.
Locations in your chosen categories are plotted on the map (and
navigation view), each represented by its own icon.
Tip: You can choose whether or not to show Points Of Interest at all, using 'Hide POI/Show POI' for the navigation view or 'Map options' for the map browser. In this way, you can keep your chosen Points of Interest categories permanently checked.
It's easy to manage your custom Points of Interest, using 'Delete
POI' ![]() and
'Delete POI category'
and
'Delete POI category'
![]() , as
needed.
, as
needed.
Optionally, you can request audible and visual warning that a POI from a
specific category is coming up. For example, you might be on the lookout for a
petrol station, hotel or cash dispenser. To set up a warning (you can have as
many as you like), use 'Warn when near POI'
![]() . You'll
then be asked to choose a category (any that are already set up for warning
will be shown at the top of the list) and choose a 'Warn when closer than'
distance, as shown below.
. You'll
then be asked to choose a category (any that are already set up for warning
will be shown at the top of the list) and choose a 'Warn when closer than'
distance, as shown below.
250 metres is a good default value, but may need to
be larger or smaller depending on whether you want warning of something huge
(for example an airport or tourist attraction) or something small (for example
a cash dispenser).
You'll probably want different audible warnings for each Point Of
Interest category. Use
![]() and
and
![]() to browse the
different warning sounds available, choosing 'Select' for the most suitable.
Finally, select 'Warn only if POI is on route', if needed.
to browse the
different warning sounds available, choosing 'Select' for the most suitable.
Finally, select 'Warn only if POI is on route', if needed.
You'd typically only select this for items that
have to be on the roadside and in your direction of travel. For example, petrol
stations, as there's no point in warning you if they're on the opposite
carriageway or in a parallel road.
Use 'Status bar preferences'
![]() to
customise the information shown at the bottom of the navigation view. For
example, you might prefer to know the arrival time rather than the remaining
time. In general, the less items you select, the larger and clearer the layout
of the status bar will be.
to
customise the information shown at the bottom of the navigation view. For
example, you might prefer to know the arrival time rather than the remaining
time. In general, the less items you select, the larger and clearer the layout
of the status bar will be.
You will have set your TomTom ONE's clock when you first started the
unit up, but you can adjust it at any time by tapping on 'Set Clock'
![]() . After choosing
your preferred time format, use
. After choosing
your preferred time format, use
![]() and
and
![]() above and
below each digit to adjust the hours and minutes shown. If you selected the
relevant format, tap on the 'AM' or 'PM' symbol to switch between
morning and afternoon/evening hours.
above and
below each digit to adjust the hours and minutes shown. If you selected the
relevant format, tap on the 'AM' or 'PM' symbol to switch between
morning and afternoon/evening hours.
Tip: If your TomTom ONE is outdoors, with a good view of the sky, you can tap on the 'Sync' button to set the clock's time automatically from the GPS satellites. You might have to adjust the hours for your correct time zone.
If the way you're positioning your TomTom system requires it, you can rotate the display with the preference 'Rotate screen' ![]() . Each time you use this, the display will be rotated further, until it's back to its original orientation.
. Each time you use this, the display will be rotated further, until it's back to its original orientation.
Select 'Change map colours'
![]() to choose
between the alternative colour schemes that are available for the maps used in
your TomTom system (several of which are most suitable for use at night). Use
to choose
between the alternative colour schemes that are available for the maps used in
your TomTom system (several of which are most suitable for use at night). Use
![]() and
and
![]() to cycle
through the different 'day colour schemes', using 'Select' when you're
happy with the scheme shown. Repeat the process for the different 'night colour
schemes'.
to cycle
through the different 'day colour schemes', using 'Select' when you're
happy with the scheme shown. Repeat the process for the different 'night colour
schemes'.
To switch between day and night colours in normal use, see 'Use night colours'.
Choose 'Change brightness'
![]() to
adjust the brightness of your TomTom ONE's backlit display. To save you
adjusting the brightness several times each day, there are two preference
sliders, one each for the daytime and night time colour schemes. For example,
you'll probably have the day colour brightness set quite high and the night
version set quite low.
to
adjust the brightness of your TomTom ONE's backlit display. To save you
adjusting the brightness several times each day, there are two preference
sliders, one each for the daytime and night time colour schemes. For example,
you'll probably have the day colour brightness set quite high and the night
version set quite low.
To adjust the settings, tap anywhere on the slider scales or drag a slider with your finger.
Select 'Planning preferences'
![]() to choose
how routes should be calculated. If your mode of transport is sometimes
different, you may want to select 'Ask me when I plan', otherwise select one of
the other options. 'Walking routes', 'Bicycle routes' and 'Limited speed
routes' have been detailed already, in 'Advanced
planning'.
to choose
how routes should be calculated. If your mode of transport is sometimes
different, you may want to select 'Ask me when I plan', otherwise select one of
the other options. 'Walking routes', 'Bicycle routes' and 'Limited speed
routes' have been detailed already, in 'Advanced
planning'.
'Toll charge preferences'
![]() give you
a chance to specify what should happen in the event of your TomTom system
considering a toll road in its calculations. Select 'Always avoid toll
roads' to automatically exclude these from future routes, select 'Never
avoid toll roads' to allow a best route to be calculated regardless of any
toll charges. Otherwise, simply leave this preference at its default of 'Ask
me when it happens'.
give you
a chance to specify what should happen in the event of your TomTom system
considering a toll road in its calculations. Select 'Always avoid toll
roads' to automatically exclude these from future routes, select 'Never
avoid toll roads' to allow a best route to be calculated regardless of any
toll charges. Otherwise, simply leave this preference at its default of 'Ask
me when it happens'.
If you'd like a compass shown on the navigation view, use 'Compass
preferences'
![]() to choose a
compass type.
to choose a
compass type.
'Direction-up' acts like a real compass (as
if mounted on your dashboard), with the arrow always pointing north.
'North-up' keeps the compass dial static, with the arrow indicating your
current direction of travel. 'Distance to destination', as it sounds,
simply indicates the relative direction and distance of your destination.
You can change the voice used for route instructions at any time by
using the preference 'Change voice'
![]() . Use
. Use
![]() and
and
![]() to cycle
through the different voices and languages, choosing 'Test' to hear a
sample in each one. Use 'Select' when you're happy with the voice that's
indicated.
to cycle
through the different voices and languages, choosing 'Test' to hear a
sample in each one. Use 'Select' when you're happy with the voice that's
indicated.
Note: Most languages feature more than one possible voice. To change the volume of the spoken instructions, see 'Volume preferences'.
You can change the language used to display all text, instructions and
menu options with 'Switch language'
![]() . Just choose the
one you want.
. Just choose the
one you want.
You can change your preferred units of measurement at any time with the
preference 'Set units'
![]() . Three questions
are then displayed, one a time, for distances, times and longitude/latitude.
Simply choose the formats you prefer for each unit and select 'Done' for
each one.
. Three questions
are then displayed, one a time, for distances, times and longitude/latitude.
Simply choose the formats you prefer for each unit and select 'Done' for
each one.
If you are left-handed, you will probably want to use 'Operate
left-handed' ![]() to place scroll controls, the map zoom control and
'Done' and 'Cancel' buttons on the left side of the display where possible. You
will then be able to tap on them more conveniently without your left hand
obscuring the display. To revert to the original button placement, choose the
preference 'Operate right-handed'
to place scroll controls, the map zoom control and
'Done' and 'Cancel' buttons on the left side of the display where possible. You
will then be able to tap on them more conveniently without your left hand
obscuring the display. To revert to the original button placement, choose the
preference 'Operate right-handed'
![]()
Operating your TomTom system left-handed!
Choose 'Keyboard preferences'
![]() to choose the
size (large or small) of the touchscreen keyboard for the entry of text and
numbers (the smaller version leaves more room for items in scrolling lists),
and to choose between alphabetic (ABCD), typewriter (QWERTY) and French
(AZERTY) layouts.
to choose the
size (large or small) of the touchscreen keyboard for the entry of text and
numbers (the smaller version leaves more room for items in scrolling lists),
and to choose between alphabetic (ABCD), typewriter (QWERTY) and French
(AZERTY) layouts.
You can adjust the way road names are displayed on the maps with
'Name preferences'
![]() . There are four
check boxes shown:
. There are four
check boxes shown:
Hopefully you'll find the occasional tip a help (each one is only shown
once, in a relevant place), but if you really don't like them then you can turn
them off altogether with 'Hide tips'
![]() or opt to start
showing them again with 'Show tips'
or opt to start
showing them again with 'Show tips'
![]()
If you plan to take your TomTom system into a hospital, plane or any
other situation where radio communications are prohibited, you should use the
preference 'Disable Bluetooth'
![]() . When
required again, simply use 'Enable Bluetooth'
. When
required again, simply use 'Enable Bluetooth'
![]() .
.
Tip: Disabling the Bluetooth transmitter in your device also helps prolong battery life if not currently plugged into a charging source.
Use 'Show version'
![]() to find out
exact version information for your TomTom system. Select 'Copyright' to
read the appropriate copyright listing.
to find out
exact version information for your TomTom system. Select 'Copyright' to
read the appropriate copyright listing.
Tap this option to reset your TomTom ONE to its factory settings. Your Home location, your favourites and your personal settings will be deleted.
To get the most from your TomTom ONE, you'll probably want to link it to your PC or Mac to back up (and restore) the contents of your memory card (SD card) including your Favourite locations and preferences, to load new maps and to install new navigation voices.
Locate the USB data cable and plug the smaller end into the back of your TomTom ONE. Plug the larger USB connector into a spare port on your Windows PC or Mac.
Note: While your TomTom ONE is connected to your computer (it will be recognised as a 'Mass storage device'), you won't be able to use it to look up routes. Normal operation is restored as soon as you disconnect from the computer.
Insert the TomTom ONE installation CD into your computer's CD/DVD drive and the Setup program should launch automatically.
Tip: If your computer is configured not to run CDs automatically, browse to the TomTom ONE CD and then double-click on the file 'Setup'.
Select 'Backup/restore' to make a backup copy of the contents of your memory card, including your Home and Favourite locations, plus your TomTom system Preferences. In the event of trouble, all of these can be restored to your device, potentially saving you a lot of time and effort setting things up again.
You can add extra voice prompts by selecting 'Add/remove extra features' and then 'Add a voice prompt', provided there is room on your memory card. Use 'Remove a voice prompt' to delete a voice that you don't want anymore, to save space.
The option 'Install free demos, etc.' will take you online, to www.tomtom.com.
The remaining selections, 'Read the manual', 'Visit www.tomtom.com' and 'Quit' are all self-explanatory.
GPS stands for Global Positioning System. GPS uses satellites to locate your current position. There is no charge for using the GPS system.
Note : Your TomTom ONE does not transmit your location, so others cannot use it to track you while you are driving.
In order to locate your position, your TomTom ONE must have a clear view of the sky. It will not work if you are inside a building or in a tunnel. It is not affected by the weather conditions and works anywhere in the world. The first time you start your TomTom ONE, it takes up to 5 minutes for the device to find your current position. If your TomTom ONE takes longer than 5 minutes to locate your current position, make sure that you are in an open place without tall buildings or trees around you.
If the GPS signal is too weak, your TomTom ONE will not know your current position. It will try to calculate your position based on the road you are on and the speed and direction you are travelling. When the GPS signal is lost, the Driving View is shown in black and white.
Here are some of the questions you may need to ask. For more questions and answers, see www.tomtom.com
Why is the navigation view now in black and white? Why won't
'Navigate to...' work?
If the GPS receiver loses reception, usually due to surrounding tall buildings, the map display
is switched into monochrome, to warn you that the information shown may not be
accurate at that moment. As soon as reception is regained, the display will
automatically switch back to colour.
How do I charge the unit?
Your TomTom ONE can be charged while you are driving using the car charger. Alternatively, you can purchase a home charger so that your TomTom ONE can be charged from a standard power socket. The home charger is available as an accessory. For information about accessories, see the accessories leaflet included with your TomTom ONE, or visit our website: www.tomtom.com
How can I reset my TomTom ONE?
You should never have to
reset your TomTom ONE under normal circumstances. However, in the event of a
problem you can reset the unit by removing it from the Holder and pushing the reset button using a
straightened paper clip.
How do I get support?
Visit www.tomtom.com/support for
technical support and contact information.
How can I find out the application version and serial
number of my TomTom ONE?
On any route summary display, the application version number is
shown in a box beneath the GPS satellite status icon. If you tap the box,
you'll see more details of your system's configuration and the current map. You
can also display this information by using the Preference 'Show version' ![]() .
.
Why should I register on the TomTom website?
Registering your product gives you access to all the latest news
about your TomTom ONE and will help us to supply you with the best possible
support.
What accessories are available?
For information about accessories, see the accessories leaflet included with your TomTom ONE, or visit our website: www.tomtom.com
We recommend that you fully charge your TomTom ONE the first time that you plug it in. It takes about 2 hours to charge the battery completely.
Note: Your TomTom ONE uses a small amount of battery power to maintain its state when you switch it off. If you do not charge it for a prolonged period of time then you will lose this state and your TomTom ONE will re-start. Your settings will however, be maintained.